Get Actual and Authentic Autodesk RVT_ELEC_01101 Exam Questions
Wiki Article
BONUS!!! Download part of TestInsides RVT_ELEC_01101 dumps for free: https://drive.google.com/open?id=1SjVfyshcZd6Vn5Sg_lVAHyaKz5lhsh3y
Nowadays, our learning methods become more and more convenient. Advances in technology allow us to learn freely on mobile devices. However, we understand that some candidates are still more accustomed to the paper, so our RVT_ELEC_01101 study materials provide customers with a variety of versions to facilitate your learning process: the PDF, Software and APP online. These three versions of our RVT_ELEC_01101 Practice Engine can provide you study on all conditions. Come and buy our RVT_ELEC_01101 exam guide!
Of course, RVT_ELEC_01101 simulating exam are guaranteed to be comprehensive while also ensuring the focus. We believe you have used a lot of RVT_ELEC_01101 learning materials, so we are sure that you can feel the special features of RVT_ELEC_01101 training questions. The most efficient our RVT_ELEC_01101 Study Materials just want to help you copyright more smoothly. For our technicals are checking the changes of the questions and answers everyday to keep them the latest and valid ones.
>> Frequent RVT_ELEC_01101 Updates <<
Pass4sure RVT_ELEC_01101 Pass Guide | RVT_ELEC_01101 Exam Dumps Collection
Furthermore, after acquiring our Autodesk Certified Professional in Revit for Electrical Design RVT_ELEC_01101 Exam Questions preparation material, you will receive free updates for 365 days. TestInsides provides up-to-date Autodesk Certified Professional in Revit for Electrical Design exam questions, latest test dumps demo and latest test experience will make you success in your career. And price is affordable.
Autodesk RVT_ELEC_01101 Exam copyright Topics:
| Topic | Details |
|---|---|
| Topic 1 |
|
| Topic 2 |
|
| Topic 3 |
|
| Topic 4 |
|
| Topic 5 |
|
Autodesk Certified Professional in Revit for Electrical Design Sample Questions (Q32-Q37):
NEW QUESTION # 32
An electrical designer has noticed lighting fixtures present in an architectural linked model. Which tool should be used to place an instance of those fixtures in the current electrical model while maintaining the position from the architectural model?
- A. Reload Latest
- B. Coordination Review
- C. Reconcile Hosting
- D. Copy/Monitor
Answer: D
Explanation:
When lighting fixtures placed in an architectural linked model need to be replicated in the electrical model while maintaining their exact positions, the correct tool is Copy/Monitor.
This Revit feature allows the electrical designer to copy elements-like lighting fixtures-from a linked model into their project, while establishing a monitoring relationship between the original (architectural) and copied (electrical) instances.
From the Autodesk Revit MEP User's Guide - Chapter 55 "Multi-Discipline Coordination" (pages 1349-1357):
"Use the Copy/Monitor tool to copy MEP fixtures from an architectural model into an MEP project, and monitor them for changes." (Revit MEP User's Guide, p. 1350)
"To copy fixtures from a linked model:
Click Collaborate tab ➤ Coordinate panel ➤ Copy/Monitor ➤ Select Link.
Select the linked architectural model in the drawing area.
Click Copy and select the lighting fixtures to copy.
Click Finish.
Revit MEP copies the fixtures to the current project and establishes monitoring relationships."* (Revit MEP User's Guide, p. 1356) Behavior and Benefits:
The copied lighting fixtures maintain the same location, orientation, and type mapping as in the linked model.
Any changes (move, delete, or modify) made by the architect in the linked model will trigger a coordination review in the electrical model.
This ensures accurate positioning and easy coordination between disciplines.
"When you select a copied fixture in the current project, the monitor icon displays next to the fixture, indicating that it has a relationship with the original fixture in the linked model." (Revit MEP User's Guide, p. 1357)
"If copied fixtures are moved, changed, or deleted in the linked model, Revit MEP notifies the engineers of the changes during Coordination Review." (Revit MEP User's Guide, p. 1357)
NEW QUESTION # 33
Refer to exhibit.
An electrical designer is issuing several sheets and wants 'Issued for Bid" to appear in the revision schedule of the title block. Drag and drop into the correct order to indicate how this can be accomplished to only the sheets that are being issued.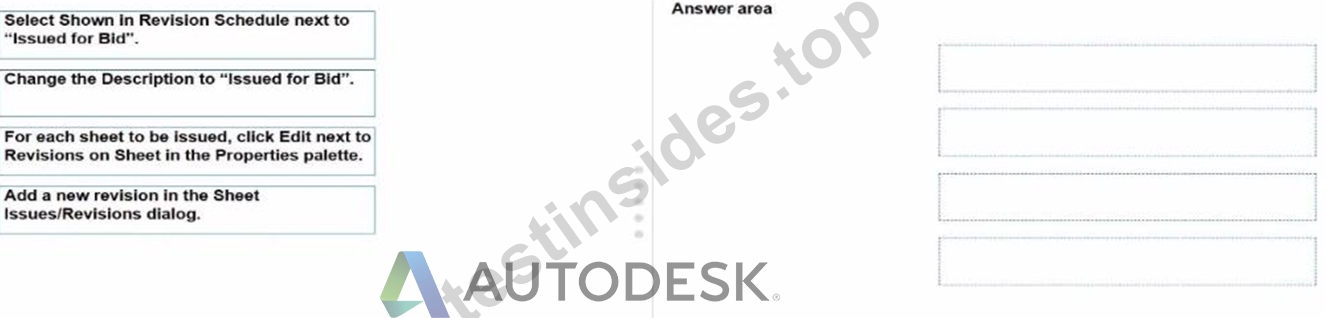
Answer:
Explanation: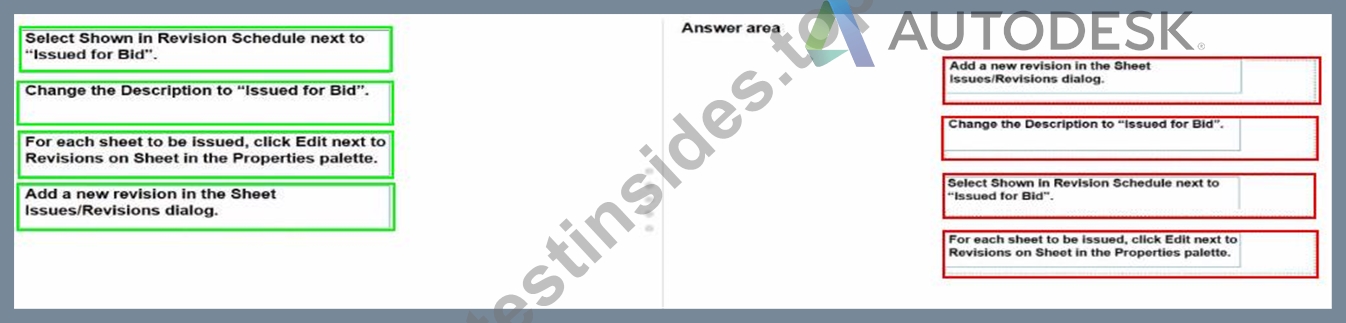
NEW QUESTION # 34
Refer to exhibit.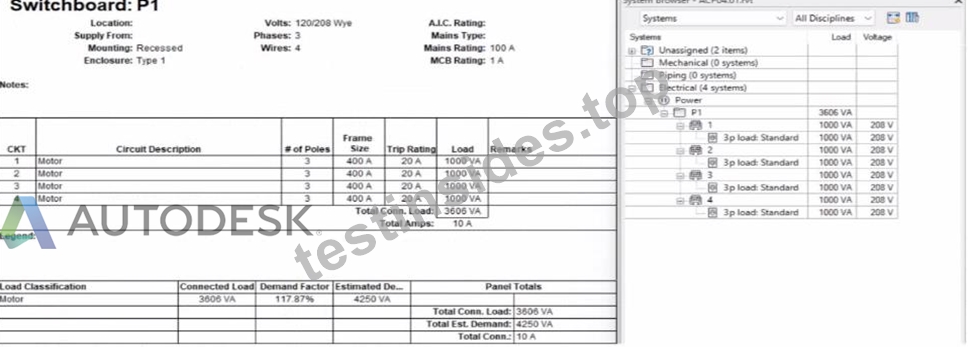
An electrical designer expects the total connected load on the switchboard to be 4000VA. but Revit Indicates a total connected load of 3606VA. What Is the cause of the discrepancy?
- A. The Motor demand factor is configured to adjust the connected load.
- B. Sum true load and reactive load is selected in Electrical Settings.
- C. Load is connected through the switchboard's feed through lugs.
- D. The connected loads are set to a different voltage than the switchboard.
Answer: A
Explanation:
In the exhibit, the designer expects the total connected load to equal the sum of the 4 motor loads:
4 motors × 1000 VA each = 4000 VA expected
However, Revit is showing a Total Connected Load of 3606 VA instead.
This difference occurs because Revit applies Motor Demand Factors automatically when a load classification is set to "Motor." Demand factors modify the total connected load based on electrical engineering rules.
Revit documentation confirms:
"Assign demand factors to load classifications."
"Demand loads can be shown on panel schedules."
In the exhibit, the Load Classification shows Motor with a Demand Factor of 117.87%, which modifies the connected load values in the switchboard totals.
Revit is therefore calculating the effective connected load based on the applied demand factor, not a simple arithmetic sum. That is why the panel's connected load number ≠ 4000 VA.
NEW QUESTION # 35
Refer to the exhibit.
- A. Properties > Edit Type > Single Line Symbology
- B. Project Browser > Conduits > Conduits with Fittings > Single Line Symbology
- C. Electrical Settings > Conduit Settings > Rise Drop > Single Line Symbology
- D. Object Styles > Conduits > Rise/Drop > Single Line Symbology
Answer: A
Explanation:
In Autodesk Revit MEP, conduit systems can be represented in plan views using either detailed or single-line symbology. The Single Line Symbology display setting is used for schematic or simplified representations - often in electrical riser or distribution diagrams.
The setting that controls whether conduits display in single-line or detailed form is found in the Type Properties of the conduit family, not in Object Styles or Electrical Settings. Specifically, it is accessed by selecting a conduit in the model and navigating to:
Properties Palette → Edit Type → Single Line Symbology
From there, users can define how fittings, rise/drop symbols, and conduits themselves are represented in single-line schematic mode. Adjusting this type parameter affects the graphical display for that conduit type throughout all applicable views where single-line graphics are used.
According to the Autodesk Revit MEP User's Guide (Electrical Systems → Conduit Systems section):
"The conduit type properties define the graphical representation in single-line drawings. By editing the Single Line Symbology in the Type Properties dialog, designers control how the conduit and fittings appear in plan views." This parameter is especially important in electrical documentation where simplified representations are required for coordination and electrical diagrams.
NEW QUESTION # 36
Refer to exhibit.
A portion of an electrical fixture family's Type Properties is shown in the exhibit.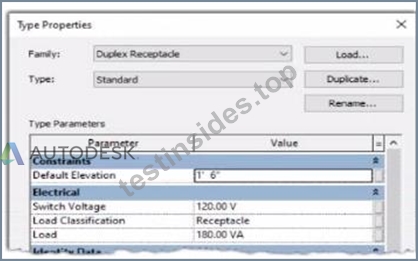
Because of the value of the Type Parameter Load Classification, an electrical designer expects the fixture's Load Classification to display as -Receptacle" when circuited. Instead, it displays as "Other".
What should the designer do to make the circuited fixture's Load Classification always match the family's Type Parameter?
- A. Edit the family. Associate the power connector's Load Classification with the family parameter. Reload the family into the project.
- B. Edit the family. Change the power connector's Load Classification to "Receptacle". Reload the family into the project.
- C. Edit the family. Delete the power connector and place a new power connector. Parameter associations will be made automatically. Reload the family into the project.
- D. Edit the fixture Instance in the System Browser. In the Load Classification column, associate the fixture's Load Classification to the family parameter.
Answer: A
Explanation:
In Autodesk Revit Electrical Design, each electrical family (such as a receptacle, lighting fixture, or equipment) can contain one or more connectors that define how it interacts with the electrical system. The Load Classification parameter determines how the connected load is categorized in electrical schedules and load calculations (e.g., Lighting, Power, Receptacle, Other).
When a family's Type Parameter Load Classification does not display correctly (e.g., it shows "Other" instead of "Receptacle" after being circuited), the issue lies in the power connector's internal parameter not being linked to the family-level "Load Classification" parameter. Revit uses the connector's classification to determine the load type when it is connected to a circuit - if the connector isn't associated, the classification defaults to "Other." According to the Autodesk Revit MEP User's Guide (Chapter: Electrical Systems - Creating Electrical Families), it specifies:
"To control how a component reports its connected load type, associate the power connector's Load Classification parameter with a corresponding Family Parameter. This ensures the load classification in the circuit matches the family definition, rather than defaulting to 'Other.' To correct existing families, edit the family in Family Editor, select the connector, and associate its Load Classification parameter with the family's Load Classification type parameter. Then reload the family into the project." This confirms that the correct approach is to edit the family and create or link the Load Classification parameter to the connector's Load Classification field. Merely changing the connector value (option C) won't ensure dynamic synchronization between the family type and circuit. Deleting and re-adding the connector (option B) won't automatically create that link. Option D (editing through the System Browser) modifies instance-level data, not family associations.
Hence, the correct and permanent fix is:
Open the family in the Family Editor.
Select the power connector.
In the Properties palette, click the small Associate Family Parameter button () next to Load Classification.
Link it to the family's Load Classification parameter.
Save and reload the family into the project.
References:
Autodesk Revit MEP 2011 User's Guide, Chapter 53: Creating Electrical Families, pp. 1254-1257.
Smithsonian Facilities Revit Template User's Guide (2021), Section 8.3. Electrical Design: Power Connector Parameters.
Autodesk Revit 2020 Help: "Associate a Connector Parameter with a Family Parameter."
NEW QUESTION # 37
......
All kinds of exams are changing with dynamic society because the requirements are changing all the time. To keep up with the newest regulations of the RVT_ELEC_01101exam, our experts keep their eyes focusing on it. Our RVT_ELEC_01101 practice materials are updating according to the precise of the real exam. Our test prep can help you to conquer all difficulties you may encounter. In other words, we will be your best helper.
Pass4sure RVT_ELEC_01101 Pass Guide: https://www.testinsides.top/RVT_ELEC_01101-dumps-review.html
- 2026 Accurate Autodesk RVT_ELEC_01101: Frequent Autodesk Certified Professional in Revit for Electrical Design Updates ???? Search for ▷ RVT_ELEC_01101 ◁ on ➡ www.easy4engine.com ️⬅️ immediately to obtain a free download ????Vce RVT_ELEC_01101 Exam
- RVT_ELEC_01101 Exam Simulator Fee ???? Reliable RVT_ELEC_01101 Source ???? RVT_ELEC_01101 Reliable Test Book ⏰ Search for ⏩ RVT_ELEC_01101 ⏪ and download exam materials for free through ➡ www.pdfvce.com ️⬅️ ☮RVT_ELEC_01101 Exam Simulator Fee
- Autodesk RVT_ELEC_01101 Questions - Tips To Pass Exam 2026 ???? Simply search for ✔ RVT_ELEC_01101 ️✔️ for free download on ☀ www.pdfdumps.com ️☀️ ????Study RVT_ELEC_01101 Test
- RVT_ELEC_01101 Valid Exam Forum ???? Reliable RVT_ELEC_01101 Practice Materials ???? RVT_ELEC_01101 Exam Tutorials ???? Open website ▶ www.pdfvce.com ◀ and search for ➡ RVT_ELEC_01101 ️⬅️ for free download ☀Vce RVT_ELEC_01101 Exam
- Vce RVT_ELEC_01101 Exam ???? Latest RVT_ELEC_01101 copyright Files ???? RVT_ELEC_01101 Latest Material ???? Download ▶ RVT_ELEC_01101 ◀ for free by simply entering ⇛ www.prepawaypdf.com ⇚ website ????Latest RVT_ELEC_01101 copyright Files
- Pass Autodesk RVT_ELEC_01101 Certification with Ease Using Pdfvce Exam Questions ???? Download 《 RVT_ELEC_01101 》 for free by simply searching on ➽ www.pdfvce.com ???? ▛RVT_ELEC_01101 Exam Simulator Fee
- 100% Pass 2026 Efficient Autodesk RVT_ELEC_01101: Frequent Autodesk Certified Professional in Revit for Electrical Design Updates ???? ⏩ www.prep4sures.top ⏪ is best website to obtain ➠ RVT_ELEC_01101 ???? for free download ????RVT_ELEC_01101 Download Fee
- 2026 Accurate Autodesk RVT_ELEC_01101: Frequent Autodesk Certified Professional in Revit for Electrical Design Updates ❗ Easily obtain free download of { RVT_ELEC_01101 } by searching on 「 www.pdfvce.com 」 ????Exam RVT_ELEC_01101 Overview
- From Frequent RVT_ELEC_01101 Updates to Autodesk Certified Professional in Revit for Electrical Design, Quickest Way for Passing ???? Open website ( www.vce4dumps.com ) and search for ▶ RVT_ELEC_01101 ◀ for free download ????RVT_ELEC_01101 Exam Simulator Fee
- Frequent RVT_ELEC_01101 Updates Makes Passing Autodesk Certified Professional in Revit for Electrical Design Easier ???? Open ▶ www.pdfvce.com ◀ and search for ✔ RVT_ELEC_01101 ️✔️ to download exam materials for free ????Vce RVT_ELEC_01101 Exam
- RVT_ELEC_01101 Test Testking ???? RVT_ELEC_01101 Dumps Questions ???? Reliable RVT_ELEC_01101 copyright Ebook ⚖ Go to website 《 www.troytecdumps.com 》 open and search for [ RVT_ELEC_01101 ] to download for free ⛺Reliable RVT_ELEC_01101 Exam Papers
- saadjbjg409345.wikiadvocate.com, www.stes.tyc.edu.tw, murraylvbo042373.wikicarrier.com, donnacepr854463.blogvivi.com, www.stes.tyc.edu.tw, owainbwuz671141.creacionblog.com, sociallweb.com, socialbuzztoday.com, inesxpfw366709.bloginder.com, www.stes.tyc.edu.tw, Disposable vapes
DOWNLOAD the newest TestInsides RVT_ELEC_01101 copyright from Cloud Storage for free: https://drive.google.com/open?id=1SjVfyshcZd6Vn5Sg_lVAHyaKz5lhsh3y
Report this wiki page